This is the second in a four-part series of Greco-Roman wrestling positions and drills that has been written and formatted in its entirety by 1995 World Champion, ’96 Olympic silver, and ’94 World bronze Dennis Hall. It should be noted that although these concepts are closely-associated with Greco-Roman, they are indeed applicable to folkstyle and freestyle, as well.
Hall — who is the Head Women’s Coach and Assistant Men’s Coach for the University of Dubuque — originally produced this material in ’20 but it has not seen publication until now. Part I addressed “First Contact”, the moment when wrestlers engage either at the very beginning of a match or following a restart (returning from out of bounds, when stood up after par terre, etc.).
Part II, which easily could have been the first part, covers the intricacies of a wrestler’s stance along with the steps and general movements that should be taken in order to maintain positional integrity.
DUBUQUE RTC ‘WRESTLING’S BASIC TRUTHS’
PART I — First Contact
PART II — Stance
PART III — Level Change
PART IV — Lifting
Part II: Stance
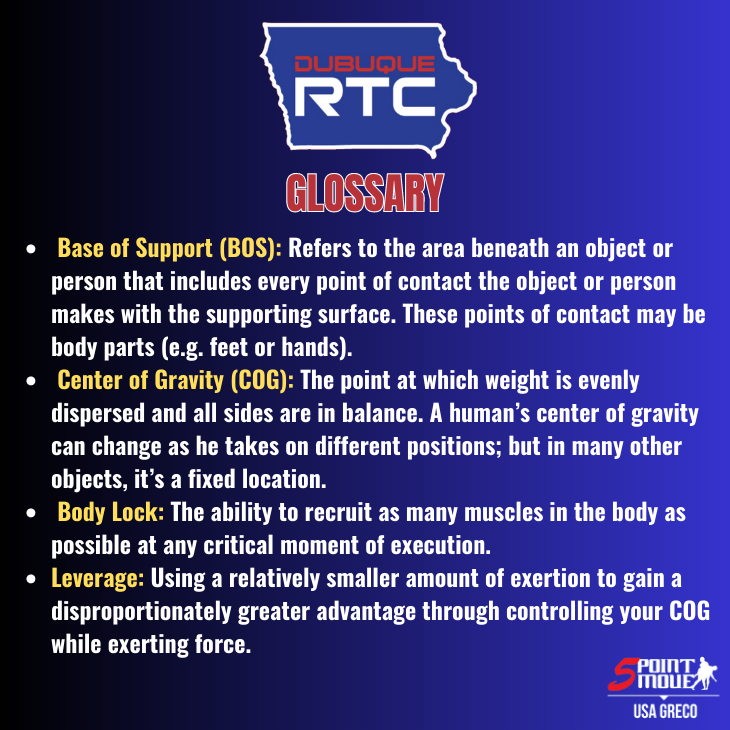
There is efficiency in a good stance. A wrestler burns less energy — and preserves valuable energy — for a strong finish when using a good stance. Stance is your base of support (BOS) or stability of structure. In order to retain balance in your base of support (BOS), you must control your center of gravity (COG) using leverage, or an exertion of force. The exertion of force or leverage is even downward pressure into the mat.
Many coaches tell wrestlers to be light on your feet. This is incorrect as doing so creates instability by being outside of your base of support (BOS) through front-loading your weight onto your toes. A larger BOS such as having your lead leg foot pointed forward and your back leg foot is pointed outward (45 degree angle), creating an “L” position with both feet. Heels will be about 2-3 inches outside of your hips.
CORRECT POSITIONAL STANCE
1. Start with your feet shoulder-width apart.
2. Take one step out to the side with each foot. This is an athletic stance.
3. The dominant leg will step forward (right-handed wrestlers will lead with their right foot; left-handed wrestlers will lead with left leg). This is a Staggered Stance. It is staggered because your feet are in a stride position.
4. It is unlikely the BOS will become unstable when you have a lower center of gravity (COG). Along with a larger BOS, a lower COG is essential for stability. As you step forward, you must change your level. Your COG is near your hips; as you step forward, lower your hips (bend your knees) to create a 135 degree angle in your knees. This is a ½ squat position. Note that your chest is behind your lead knee. Any time your chest is over your lead knee, you become front-loaded and are therefore unstable. Your COG is outside of your BOS in this situation, which creates instability. You now become vulnerable to an attack from your opponent.
5. Turn your back foot out to a 45 degree angle. Now drive equal pressure throughout your entire foot into the mat. Your foot should be flat. Knees on both legs should be over your foot making a straight line down from your knee to your ankle. Do not turn your knee in. Keep it in line. If you don’t feel your abs engaging, you’re not driving your feet into the mat or using leverage. Drive your feet into the mat until your abs engage. Now you have a strong BOS and are controlling your own COG. This will greatly improve your offense and defense in wrestling.
6. A Square Stance is an athletic stance where your feet are one step out from shoulder-width and in-line. Both toes will be pointed outward at a 45 degree angle. Feet will be even and heavy into the mat by engaging your core. By using a square stance, you will be able to apply upward pressure to your opponents center of gravity, thus creating a disruption in his/her center of gravity and causing them to be forced out of position. This creates a window of opportunity for you to score. The square stance is a solid stance and gives you 360 degrees of movement in a box-like motion (much like the dots on the number four on a dice). The Square Stance is best for Greco-Roman wrestling. It can also be used in folkstyle wrestling as a transition from the Staggered Stance to lift your opponent up and break his/her positional stance. This will make your opponent overreact, creating more opportunities for you to score.
DRILLS TO CREATE CORRECT POSITIONAL STANCE
1. Get into the correct positional stance.
- Create downward pressure by engaging your core, chest, legs, etc. Arms are 2-3 inches away from your body in a forward direction.
- Your head is up. Head-up is critical because as soon as your head goes down, you become front-loaded and are unstable.
- Hold the correct engaged position for one minute. As a reminder, if you don’t feel your abs engaging, it means that you are not driving your feet into the mat or using leverage.
*NOTE: You may not be able to get your core engaged initially until you have performed enough repetitions to create muscle memory. With time in proper position, .your core will become engaged.
2. Once in the correct positional stance, complete small circular motions with your hips. Your core should be engaged and pressure or leverage should be down and into the mat through your feet. Feet should be flat and delivering even pressure. Your hips must stay at a low, even level. Do not change your level as you execute the small circular motions.
*NOTE: The objective of this practice is to learn to create pressure of leverage into the mat as your COG changes slightly. You will soon feel when you have COG, and when you don’t. As you get closer to where you started, you will feel more even leverage into the mat.
3. Get into the correct positional stance against a wall. Your lead foot should be 2 inches away from the wall.
- Hands on the wall about chest height.
- Feet will drive down into the mat as you push upward with your hands against the wall. This creates the downward leverage you need to be heavy into the mat.
- Hold this for 30 seconds. Complete 4 rounds with a 30 second rest in between each round.
4. The next drill allows you to change your lead leg in your stance and become comfortable with both legs as lead legs.
- Get into the correct positional stance, with weight such as dumbbells (or even water bottles). Weight will vary based on age and strength of the wrestler.
- Hold weight with a 90 degree angle in your elbow (weights in front of you). Elbows will be 2 inches away from your body in a forward direction. The weights will be in the direction of the lead leg.
- Hold that position for 5 seconds. Engage your core and drive your feet down into the mat using your leverage.
- Slowly rotate in this position to your non-dominant leg and once there hold for 5 seconds before rotating slowly back to your dominant leg. Complete 4 rotations.
5. The objective of this drill is overall body strength, stance, and learning how to avoid becoming front-loaded in your stance. Being able to maintain a strong stance when you have weight outside of your COG.
SUMMARY: Get into the correct positional stance with weight such as dumbbells, gallon jugs of water, or simple water bottles. Weight will vary on age and strength of wrestler. Start by holding weights with a 90 degree angle in your elbows and weights in front of you in a forward direction. Elbows will be 2 inches away from your body. The weights will be in the direction of your lead leg. Slowly extend arms and hold weights out in front of you while remaining in your correct positional stance. Engage your core and drive your feet down into the mat by using your leverage. Hold the extended position for 5 seconds. Slowly move weights back in towardS your body to the beginning arm position and hold for 5 seconds. Complete 4 rotations.
SQUARE STANCE/PRESSURE RELEASE DRILL
1. Get into an athletic stance with feet shoulder-width apart, as well as with taking one step outward with both feet. This creates a wider than shoulder-width position.
2. Point toes out at a 45 degree angle.
3. Complete this drill once in each direction — both right and left.
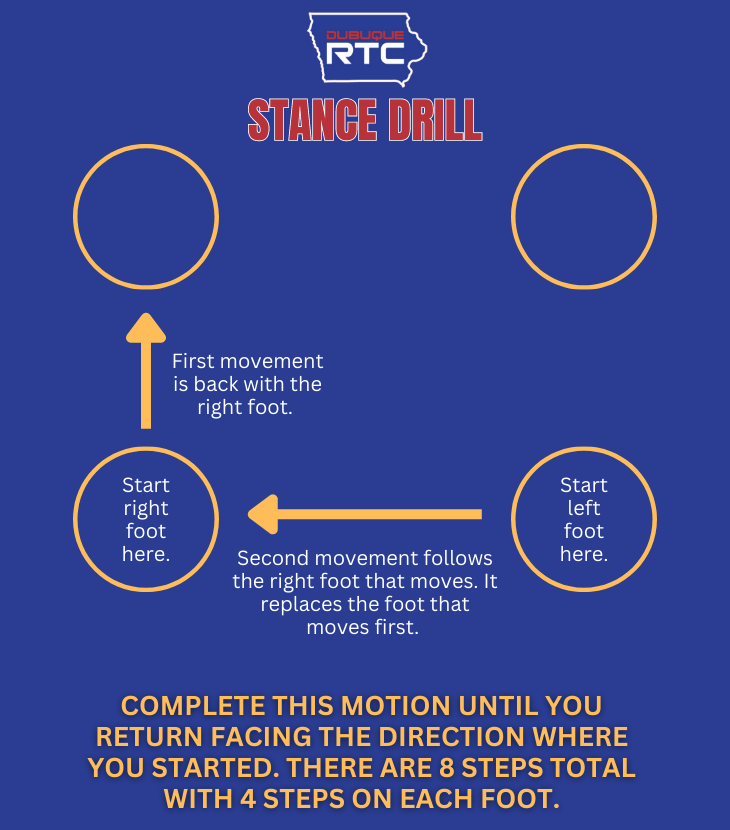
SQUARE STANCE DRILL
MOTION-STANCE DRILL
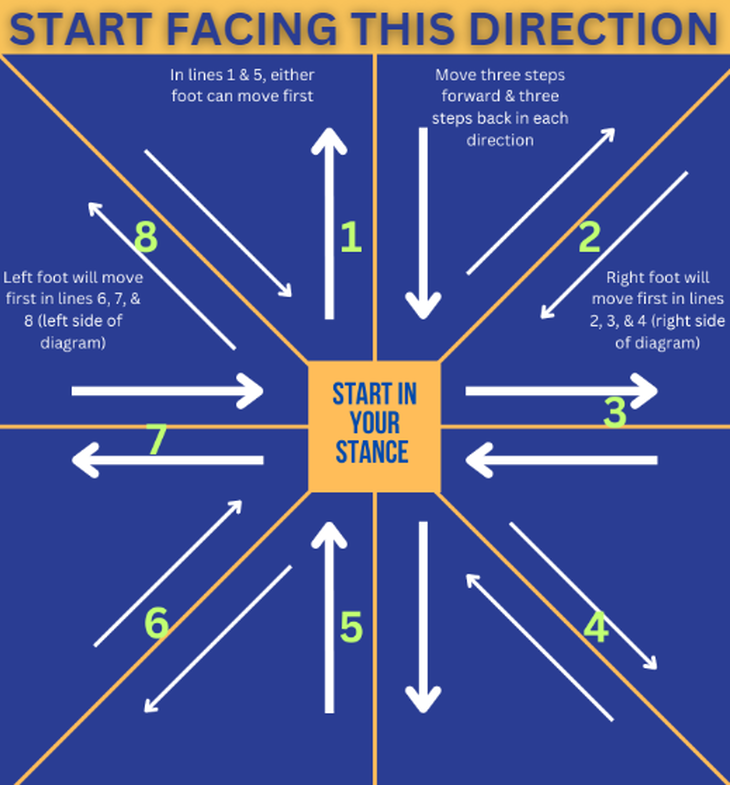
MOTION-STANCE DRILL
1. Start from either stance. Move side to side by taking 2-3 inch steps in one direction. Start by moving to the right.
2. As you move, you will get heavier on the left foot first with even pressure into the mat before actually moving.
3. Then pick up your right foot, keeping your hips level and move your right foot 2-3 inches to the right. This is a transfer of weight. Now you will get heavier on your right foot with even pressure into the mat before moving again.
4. Pick up your left foot, keeping your hips level and move your left foot 2-3 inches to the right. Now you are back to your original stance. Again, this is a transfer of weight. It is important to become heavier on the opposite leg that is stepping in order for your step to remain small and uniform. This allows you to remain in your stance and not break position. It is more difficult to end up in a stance that has your feet too close when using this motion. This also allows you to control your COG better. This works for every directional movement in wrestling.

Listen to “5PM50: Mr. Fantastic Benji Peak” on Spreaker.
Listen to “5PM49: Robby Smith on coaching, fatherhood and mentors” on Spreaker.
Listen to “5PM48: Austin Morrow and Gary Mayabb” on Spreaker.
SUBSCRIBE TO THE FIVE POINT MOVE PODCAST
iTunes | Stitcher | Spreaker | Google Play Music

Notice: Trying to get property 'term_id' of non-object in /home/fivepointwp/webapps/fivepointwp/wp-content/themes/flex-mag/functions.php on line 999

